FareHarbor + Google Things to Do: Setup Guide
June 15, 2026
Step-by-step guide to connecting FareHarbor to Google Things to Do, syncing items, mapping POIs, and earning the Official Site badge.
FareHarbor powers booking for thousands of tour operators, but most FareHarbor users still send the majority of their Google traffic to OTAs instead of capturing it directly. Google Things to Do (GTTD) is the surface where that traffic now lives — and the integration with FareHarbor is straightforward once you know the order of operations.
This guide walks through the exact steps to sync FareHarbor inventory with Google, map each item to the right Point of Interest (POI), and earn the Official Site badge on Google Things to Do. If you'd rather hand the whole setup off, Thingstodomarketing does this for FareHarbor operators end-to-end — schema, POI mapping, badge claim, and ongoing GTTD Ads campaigns. Ready to start? Become a FunFinder vendor and we'll wire up your FareHarbor catalog.
Why this matters for FareHarbor operators
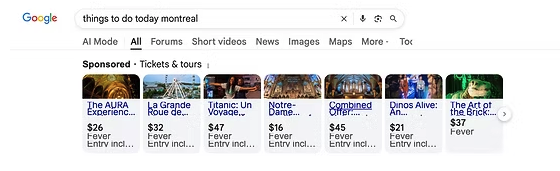
When a traveler searches "things to do in Rome" or your branded tour name, Google now shows a Things to Do module with tickets, prices, and a booking link. If only Viator and GetYourGuide are connected, every booking costs you 20–30% in commission. Wiring FareHarbor directly to GTTD gives you a free organic listing as the official supplier — and unlocks paid placement through Google Things to Do Ads when you want to outbid the OTAs.
For a primer on the surface itself, see how Google Things to Do works.
Prerequisites
Before you start, confirm you have:
- An active FareHarbor account with at least one bookable item published
- Admin access to your Google Business Profile for the location(s) you operate from
- A public website with a working booking link to each FareHarbor item (the lightframe link is fine)
- Schema.org markup on those product pages —
Tour,Event, orProductwithoffersandaggregateRatingwhere applicable
If your product pages are bare, fix that first. Google will not award the Official Site badge to a domain whose item pages have no structured data.
Step 1: Turn on the FareHarbor Connectivity Partner program
FareHarbor is an approved Google Things to Do connectivity partner. Inside your FareHarbor dashboard, open Settings → Integrations → Distribution Channels and enable Google. This pushes your item catalog (name, description, duration, pricing, availability) into Google's reservation feed.
You don't need to build the feed yourself — FareHarbor handles the technical handoff to Google's Booking Module. Your job is to make sure each item has:
- A clear, search-friendly title (avoid internal SKU codes)
- A description of at least 200 characters
- Accurate duration and meeting point
- Live, accurate availability for the next 90 days
Items missing any of these fields get filtered out of the feed silently.
Step 2: Map each FareHarbor item to a Google POI
This is the step most operators skip — and it's the single biggest reason items show up under the wrong landmark or don't show up at all.
Every GTTD listing is anchored to a Point of Interest (a museum, neighborhood, monument, park). Google needs to know which POI each of your items belongs to. In FareHarbor's distribution settings:
- Open each item individually
- Find the Google POI mapping field
- Search Google's POI database for the closest matching landmark
- For city-wide tours (food tours, ghost tours, walking tours), pick the neighborhood or the central landmark the tour starts at — not the entire city
If your tour visits multiple POIs, map it to the primary one (usually the start point). You can read more about category and venue selection in our GTTD Ads FAQ. Prefer to have us map every item for you? Become a vendor and we'll handle POI mapping across your full catalog.
Step 3: Verify the Official Site link
Once items are syncing, Google needs to know your domain is the official supplier. This is handled through your Google Business Profile (GBP):
- In GBP, open Edit profile → Contact → Website
- Set the website to the exact domain that hosts your FareHarbor booking pages
- In GTTD's partner portal (your FareHarbor rep can grant access), claim each item and confirm the booking URL matches your GBP website
Google then crawls the URL, matches it to your verified GBP, and after 7–14 days flips your listing to "Official site" with your logo and direct booking link above the OTA tiles.
If the badge doesn't appear, the usual culprits are: a redirect chain on the booking URL, a mismatch between the www. and apex domain, or missing schema on the destination page.
Step 4: Monitor performance and iterate
Track these weekly in your FareHarbor dashboard:
- Bookings attributed to Google — should grow steadily for the first 60 days
- Click-through from GTTD to your booking page — visible in GBP Insights
- Conversion rate from FareHarbor click to completed booking — target ≥ 6% for tours, ≥ 10% for tickets
If clicks are coming but conversions are flat, the problem is almost always the landing page itself — slow load, hidden price, or a booking widget that fails on mobile.
Common FareHarbor + GTTD mistakes
- Mapping every item to the city instead of the POI. Reduces visibility on landmark searches.
- Letting FareHarbor's auto-generated titles run ("Premium Walking Experience — 90min — Daily"). Rewrite them.
- Not enabling Google as a distribution channel because Viator already drives bookings. The two coexist. GTTD doesn't replace OTA bookings — it adds direct ones on top.
- Skipping schema markup on the FareHarbor lightframe page. The lightframe is an iframe; the schema must live on your parent page, not inside FareHarbor.
How Thingstodomarketing optimizes this for you
If you don't want to manage POI mapping, schema audits, and badge claims yourself, that's exactly what we do. Our GTTD Subscription handles the full FareHarbor → Google pipeline:
- GTTD setup: schema validation on every FareHarbor product page, sitemap and feed checks, GBP sync, and Official Site badge claim across up to 25 activities.
- POI mapping: we map each FareHarbor item to the highest-traffic POI in your city so listings actually surface on landmark searches — see the landing page criteria Google uses to rank you.
- GTTD Ads campaigns: we run paid Google Things to Do Ads for your travel campaigns, with first-party booking attribution back to FareHarbor — so you can see exactly which ad spend produced which direct booking.
- Ongoing optimization: weekly checks for broken feeds, badge regressions, and conversion-rate drops on your booking pages.
Pricing and what's included is on the pricing page. Most FareHarbor operators are live within 7–10 days — become a vendor to get started.
Next steps
Once your items are syncing and you have the Official Site badge on at least a few products, the next lever is Google Things to Do Ads — paid placement above the organic OTA tiles, billed on CPC, that sends bookings straight to your FareHarbor checkout.
For a deeper dive into the badge mechanics and ranking signals, browse our GTTD Ads FAQ or the rest of our tourism marketing blog. When you're ready to launch, become a FunFinder vendor and we'll get your FareHarbor inventory live on Google.
Want this kind of strategy applied to your tours?
Setup gets your Official Site badge live on Google Things to Do. Organic Official Site listing always included.